Saturday, March 31, 2012

Front wood of flower press
Back wood of flower press

Years ago I had a flower press, but I have no idea what happened to it and it was small.  It could only do little teeny flowers.  So, I decided to make a new one, bigger and to my own specifications and more personalized.   I've been working on this flower press for the past 2 days.  I had some help from my husband.  He cut 2 pieces of wood for me and a bunch of cardboard the same size as the wood from some boxes.  I spray painted the wood yesterday after work.  I painted on piece pink and the other blue.  Today, I painted some flowers on the pieces of wood.  I pulled out some absorbent paper (2 sheets to go between each piece of cardboard).  Tomorrow, I'll drill a hole in each of the 4 corners.  In each hole, goes a screw that goes through all layers of wood, cardboard and paper and a wing nut fastener.    When I have those holes drilled, I can spray the clear fixative spray over my boards to protect the flower paintings.  The idea is to use the wing nut screws to tighten the flower press over the flowers to dry them out and press them.  If you need step by step instructions, here is a good website to help you.  http://www.ehow.com/how_2069305_make-flower-press.html

Thursday, March 29, 2012

Teddy Bear Sunflowers
High Scent Sweet Peas
So seeding this year has been a dismal failure except of course the darn beans that the whiteflies feasted on.    Those are now safely protected with those yellow cards with icky, sticky stuffy on the outsides that reminds me of rubber cement.  But it's a little too late.  Close the barn door after all the horses have escaped except the ugly old hags that are only good for eating your oats.  They've become our friends so we keep them around and talk to them and feed them because we consider them family.  :)  So, this meant it was time for a visit to Burpee Seed Company's website.  I chose Burpee because they've been around forever and cater to the home gardener and I believe them when they say they are not in the pockets of the GMO monsters like Monsanto. What did we get?  
Sweet Basil
Common Chives
Double Curled Parsley
Bushsteak Hybrid Tomato
Old Spice Mix Sweet Peas
Hopefully, we'll have some good luck with these seeds when they come.  I saw an interesting planter for sweet peas that I want to try.  It's just a basket with a bunch of bamboo-like supports for the sweet peas to climb up.  It's not much to look at in the beginning, but I bet it's gorgeous once it has a blooming plant growing all over it.  I'm just tickled about sweet peas because I love fragrant plants.  For about 3 weeks while I was walking my dog, there was a fragrance that had my nose leading me all over the place trying to find this scent that was so wonderful I just HAD to find it.  Every day, twice a day I was hunting and hunting trying to find the plant that owned the aroma.  The dog just couldn't understand why I was acting like a dog, sniffing here and there, up and down.  The neighbors must have thought I'd lost my marbles.  I never did find the source of the scent so I expect next spring I'll go through it all again.  As always, before planting these seeds I looked it up.
 
The directions said to plant in November or early spring.  We'll plant them right away when they get here.  I also noticed that it was recommended to nick the hard outer coating with nail clippers to get more of the seeds to germinate.  Be careful to nick only the outer coating and not the seed though.  My daughter soaks her seeds overnight before she plants them.  I'm not sure how that would work with these.  I might try that with some of these as an experiment and see which works better.  These seeds are planted the old fashioned way; make a furrow and put the seeds in the furrow.  Then, cover the seeds.  Remember we talked about gardenias? They like acidic soil.  These are opposite.  These like alkaline soil.  Sweet peas take 3 - 4 weeks to germinate my friends so be patient.  Be sure to give them something to climb up and protect those seedlings from birds, snails and other predators.  Morning sun and afternoon shade suits these flowers to a tea!  As they grow, be very gentle when training them up their trellis or whatever they are growing up, the stems can break easily.  Like all other blooming plants that we love to talk about lately, deadheading is necessary.  Remove those spent blossoms if you want new ones and unlike petunias, don't wait until they are all the way dead, do the dead heading just as the blossom is beginning to fade for the best results.  It is said that the more flowers you cut off the plant for bringing inside to enjoy, the more the plant will produce.  So remember to enjoy some of these blooms inside your home too.  
As always, I want to share a couple of wonderful sites for sweet peas reference that helped me.
http://www.selectseeds.com/sweet_peas05.htm
http://www.reneesgarden.com/articles/swp-direct-tips.html

Wednesday, March 28, 2012

Glorious Geranium Blossoms leftover from last year 3/28/2012
I just love geraniums.  They are a simple flower that bloom from spring through the end of summer.  There seems to be very little that can go wrong with them.  They are somewhat drought tolerant so even if you forget to water them once in awhile, they forgive you.  They are like your children and if you do too much, they rebel and act up.  So too much water and the roots will rot.   Geraniums need to be dead headed to get them to continuously bloom.  If the spent blooms are not removed, then new blossoms will not come and the plant may go to seed.  There are two different fertilizers recommended for geraniums - use either 20-20-20 or 15-30-15 formulas.  As always, when fertilizing, water after applying the fertilizer to avoid burning the plant.  Clay soils need to be improved with organic matter so your geraniums will thrive.  The flowers do well in containers, planted in the ground or brought inside for the winter.  If planted directly in the ground, they prefer a shallow planting rather than deeply planted.  I've been very lucky and had the same plants for several years.  There are 3 main methods of overwintering geraniums.  
  1. Hang bare roots upside down in cool place (45-50°Fahrenheit or 7.5-10°Celsius)
  2. Bring the plants inside as house plants
  3. Using a sharp knife or pruners take a 3-4 inch cutting, pinch off lower leaves, dip in rooting hormone and stick in a mixture of coarse sand and sphagnum peat moss
Here are a couple sites to help you with Geranium Care:

Monday, March 26, 2012


Whitefly update: The bean plants are tanking.  I've completely lost 3 plants entirely.  Shown here are 2 more that I don't expect to recover.  I've been treating the plants since Friday with spray and each day I inspect, I continue to see whiteflies on the undersides of the leaves.  I ordered some whitefly strips from amazon.com.  In the beginning I was really upset, but as I thought about this I decided that the beans took only a week to really start growing.  I can grow some more bean pretty quickly so I need to stop whining and just wait for silly, yellow strips and then get rid of the insects and grow some more beans.  Hopefully the strips will get here soon because I see they are attacking the really healthy bean plants too now.  Notice the curling of the leaves.  When I saw the wilting leaves, I knew.  It was confirmed when I turned the leaf over and saw all the little white buggers just hanging around having a little tea party without me.


Lessons Learned: 


  1. Do not put newly bought houseplants near your garden plants.  
  2. Always keep whitefly/aphid strips on hand so you don't have to wait for them to be shipped
I didn't want to just complain tonight so I thought I'd share a cool little ornament terrarium I found at Save-On crafts.  Naturally, this is not what they advertised
it as.  You can find it here.  I used it for air plants and orchids.  Another cool glass piece I love for showing off single cut flowers is a flower shaped vase.  It typically is used for a hibiscus flower but I use for any flower I see blooming that I find.  It's always nice to see what others use to display their garden showpieces.  Getting ideas is part of what blogging is all about after all.  Finally, that little orchid that I got as a free bonus for purchasing 3 plants from Orchid Master that I told you about last week?  It has 2 blooms!  I was soooo tickled!  It almost made up for those wicked whitflies.  ALMOST, but not quite.
New Orchid - Notice 2 Buds Baby!!


Sunday, March 25, 2012

Today I tried to make that living wreath following the instructions on their website.  Well, let me tell you what... what a pain in the neck!  If the plants live through the stress, I'm not sure if the gardener will.  The first attempt I tried I didn't realize it was a failure until I got to nearly the end.  It was the point where I was supposed to put the second metal frame on and squeeze all the beautiful flowers through the wires without killing the flowers or breaking them that I realized that it just wasn't going to work.   About then, I decided to reconstruct things a bit differently and work smarter not harder.   I have a double front door, so I needed to make 2 of these.  I took some photos all along the way so I could show you how it looks when an amateur does it.  Just the same, I'll leave mine in the back for a few days and see if the plants die before I hang them on the front door.  I'm not as confident in my abilities as I used to be.


Let's start with your supply list. 

  • 2 wire wreath frames or 1 wreath frame cage per wreath
  • sheet moss (lots)
  • soil with time release fertilizer mixed in
  • flowers for wreath (consider location wreath will be in)
  • plant wire (lots)


(Note: the completed wreath shown is the failure) 


Step 1

Take the sheet moss and line the wreath form with the prettier, green side facing out.  Be sure to leave no holes that the soil can escape through.  Take the time to be choosy about your sheet moss used.
Line wreath with sheet moss

Step 2

Place the soil and fertilizer you mixed together in the center of the moss in the wreath frame being careful not to put so much that it will leak out make a big mess.  Been there, done that, got the t-shirt and wasted a lot of time on clean up.  
Add soil with fertilizer to wreath


Step 3

Add the top cover of sheet moss with the pretty side up.  Be sure to completely cover AND contain the soil.  You may want to roll up the sides of the moss a bit to ensure the soil does not come out and then add the wire wreath cage cover (if it's that type you are using) or put a second wire wreath frame on top of the moss and fasten with floral wire.

Step 4

Poke holes for your flowers and "plant" them into your moss wreath.  Pack sheet moss around the newly planted flowers to ensure the plants and soil stay in place.  Use floral picks to gently direct flowers to grow in the direction wanted and stay in place.  Spray with a gentle hose or spray bottle filled with water that is uncontaminated.
Finish wreath with  Verbena, Petunia, & Torenia


Saturday, March 24, 2012

Whiteflies eat bean plants! YIKES!

Whitefly Infestation
Whitefly Invasion!  Yep. Yesterday afternoon I did my walk about and I saw something was eating the leaves of my bean plants.  But, there was another sign.  The leaves looked wilted.  Do you see in the photo above how the leave is sagging and bent over itself a bit?  Those two things together show me the plant is in distress.  I needed to inspect the plant more closely and the first place I look is hiding places.  I looked at the undersides of the leaves and I saw little white bugs.  Now don't go thinking I'm some expert on garden bugs.   I work a real job during the week just like everyone else and from 6 pm to dark Monday through Friday and on  Saturday and Sunday, I try to squeeze in gardening, canning, painting, scrap-booking and every other kind of crazy hobby I come up with for that week.  Gardening and cooking are my constants and I have been sewing since I was in junior high.  But back to the bugs. 
Close up of  Whiteflies
 I saw the bugs and I immediately did what I always do when I see bugs of any kind on my plants - filled a spray bottle with warm water and dish soap and sprayed the entire plant top to bottom tops and undersides of leaves, stems and even the soil for every bean plant that shown any sign of the white bugs.  I took photos before the treatment and expanded the photos so I see a close up of the insects since my eyesight is not good enough to get a microscopic view or close up enough to identify them.  I was able to identify the infestation as whitefly with the help of the internet and photos.  While no one said to treat with the soapy water spray, it really worked wonders!  While my leaves didn't care for it much, neither did the insects and nearly all of the whiteflies flew the coop.  We had only a couple of the insects return the following day and I sprayed again.  I was not able to get a regular insecticide until Saturday night because I had my grandsons spend the night on Friday night as I was the babysitter on Saturday.  I'm not unhappy with my response nor my results, but tomorrow I'll use the commercial spray and hopefully eradicate them for good.  I want to point out why these daily walk arounds are so important.  While I was reading up on these insects, one man said that his entire sunflower planting was decimated by whiteflies in 18 hours.  This means that just skipping one day of walking around your garden/yard, you miss the opportunity of catching this kind of problem and maybe losing all of what you planted of a single species of crop.  It was only a matter of a few hours for this to spread to all of my bean plants and they are spread all across the various corners of my lanai.  This is just a little something to consider the next time you decide you're too tired or too lazy to stroll around the yard to check up on your garden.

Thursday, March 22, 2012

Gardeners Welcome
SC92 Orchid Plant Pot Shin Shiang Diamond 'Sun #1'
The orchids arrived today.  With the 3 that I ordered came a free one.  I giggled to myself because a free orchid means that it comes in a smaller pot.  We know this and we expect it.    We also expect that the plant will be substantially smaller and the pot will be substantially smaller because it is free.  Well, the pot was a tiny bit smaller, not a lot.  The plant, believe it or not was actually the same size, if not a teeny bit bigger.  It made me a smile.  I looked the plant up and I decided to share a photo with you of what the orchid looked like. I was more than pleasantly surprised.  The arrival of orchids is always a time of excitement and fun.  I was really glad that I had thought to get the supplies the other day because they were on hand when I needed them.  Buying premixed orchid plant media is very expensive, so I always mix my own.  Each type of orchid has a preference of what they like best.  As a general rule, I typically use mostly orchid bark and moss and for some I use charcoal.  Today, the mixture was moss and bark.
how repotted orchid looks with clips
free orchid
I mix the moss and bark together in an old plastic washtub (dry) and then add water to cover and let it soak for for about 15 minutes or so.  This is a messy job so this is best done outside.  The orchids prefer to be a little cramped but not claustrophobic, if that makes sense.  Never, ever bury the rhizomes or base of the plant with the planting media (bark, moss or charcoal).  If the plant media is not packed in well enough to keep the orchid sturdy, give it a stick and a couple clamps to make it secure.  If an orchid does not have a secure base from the very beginning, it will not grow secure roots and it will wither.  You will be fighting from the very beginning to keep the orchid blooming and flourishing.  

Sick Pentas 3/22/2012
Chinese Lilies
We aren't all about orchids today... I found a sad plant today.  My pentas was doing fine until about a week ago.  This is not a new plant.  It's about 3 or 4 years old now.  I understand that most people treat these as annuals and buy a flat of them and plant them to die at the end of the autumn.  Here, that doesn't happen if you are lucky.  Anyway...they were coming back just great until about a week ago and then they started looking rather peeked.  You can see they look sort of faded green or gray-green.  We'll continue to keep an eye on these guys over the coming days to see how things turn out.  We've had afternoon showers for the past two days and that may be just what the doctor ordered.  On the positive side, the Chinese Lilies are bursting with joy!  The couple of days of spring rain has worked magic with them.  I wish they'd hurry up and bloom!  The front looks absolutely beautiful with the flowers planted and the little hummingbird glass. 

Wednesday, March 21, 2012

Palm, Fern, Umbrella Tree, Bougainvillea
I feel old and crotchety today.  Walking has been a problem for the past few weeks so I went to the doctor and he adjusted my back.  He said I knocked some discs out of alignment.  I played dumb and pretended I didn't know how I did it.  Now we all know how I did it, but you'll keep my secret won't you?  You saw those nice photos of the containers of plants, right?  They didn't magically get arranged my friend.  I jostled them and manhandled them this way and that.  I carried them up steps and pushed them around and then decided I didn't like them here or there and them moved them 15 ways to Sunday.  Of course they were full of soil and plants already.  These are all established plants.  Well, now that my doc made his adjustments, I can hardly walk at all.  I managed to plant the two dianthus and hang those planters on each side of the garage and water the plants today, but that's all I could do.  I cleaned up my mess, but I didn't even notice my dirty fingers until about 5 minutes ago.  The soil is embedded into the bases of my fingernails and I feel gross.  I did a nice little manicure on Monday and that is shot to hell and back.  The nails are all broken and I feel like the little orphan that no one will adopt.  
So I've been thinking.... no one just happens to suddenly like to garden.  We are taught by someone.  Somewhere along the way, we are introduced to the plant world and we develop a love of botany.  We all have fond memories somewhere.  I know my girls have some not so fond memories of me dragging them to the prairie while I was taking a botany class and I was observing the plants, doing measurements, taking photos, doing drawings, and all kinds of stuff for my class.  Either way, to this day, they groan at the memory and I smile.  Same memory... very different perception of the experience and I still draw pictures of flowers.  Sometimes we think about what we've lost since for many of us those that introduced us to the wonderful world of gardening are no longer around or spending time with us, but we really need to think about the gift we have been given.  The gift we are probably passing on to another generation or two generations.  Sharing a gift of loving to do something, the gift of a passion, is something we cannot quantify or pretend to have.  


Mystery plant
Today, I'm ending a little differently than usual.  Please leave a comment with a piece of advice someone gave you about plants that you thought was unique.  Don't forget to mention who gave you that advice.  Finally, if anyone knows what the name of this white flowering plant is, I would be very grateful, as I have forgotten and like I dope, I threw away the tag on this one.  It's a newer plant that I never grew before last year and it is very hardy and I'd love to be able to talk a bit about it.

Tuesday, March 20, 2012

New addition to our orchid family
Shopping for plants at the local home improvement store was interesting today.  I had the tomato plants in my cart.  Bonnie Bell plants.  Then I glanced over at a little pamphlet about raised bed vegetable planting.  Every whistle went off in my head as I saw Miracle-Gro, Bonnie Bell, Osmocote and Scotts.  The tomato plants and pamphlet were returned to the shelves. Every vegetable and herb plant was Bonnie Bell, no choices at this store.  That meant no buyer with me.  I don't want to eat stuff that uses a bunch of chemicals and has been tested to with results to match what they want the results to say.  I'm distrustful of these companies and heads of companies who have shown themselves to be in the pockets of our politicians, by gifting trips and other valuables.  Sorry.  So, Home Depot did not get my business for my vegetable garden.  I talked to my daughter about it later and we'll both be looking at other options to find organic or non-modified tomato plants for our gardens or go from seed.  
Verbena and Torenia
Purple Pansy and Pink Dianthus
They had some really gorgeous orchids and yes, I treated myself to a new, yellow orchid for a cheap, cheap 11 bucks.    I found some nice pink and white flowers that look just perfect for the living wreaths I want to work on this weekend.  I have a double shepherd's hook in the front that always needs 2 new flowers every year.  This year they got some purple pansies with white tips.  I did manage to put those in the moss the pots that go inside the wire hangers that hang on the shepherds hooks.  Josh would not be happy with me though, because I forgot to put the fertilizer in when I planted them.  I remembered after I sat down for the night.  He would have reminded me while we were doing the work because that's his favorite part.  I also found some really pretty, pink and white dianthus and some tiny little purple pansies that look like a vine type.  So far all of the plants I bought need at least 6 hours of sun per day and have average watering needs with good drainage.  They are extremely easy to take care of.  The pansies require dead-heading (pulling off the dead blooms) for new blossoms to continue providing a full blossoming plant.  Pansies also need to be pinched back from time to time to keep it from getting too spindly.  Because it gets so hot here, they require a daily watering regimen.  I usually do a daily walk around my yard after work each day.  I find this is relaxing and gets my mind in the right frame and puts my priorities in the right place anyway.  I picked up necessities for the orchids - bark, rocks, and food.  Then.... the non-necessity...... my flower clips.  Those little clips for holding the flimsy orchid stems to the bamboo sticks.  I found some very cute ones with lady bugs on them. 


I met a very nice foreign lady at the store.  She showed me that a plant was in seed and seeds were falling all over the ground.  She picked a few up and handed them to me.  She told me she had the plant at home and it was very nice and very easy to grow from seed. I put the seeds in my wallet and thanked her.  This was the only plant that did not require full sun.  I need to do a bit of research on this plant and find out what the seeding requirements are.  I don't usually grow or plant things that I have not researched first.  I'm one of those... yes it's ok to groan now.    I hate dead plants because I hate failure.

Monday, March 19, 2012

Gardenia (Gardenia jasminoides)
Gardenia in Bloom 2011
 I have always loved gardenias because they look so elegant and smell like I am dancing a waltz.  Gardenias can be a little tricky to keep flourishing in your yard.  I've tried them a few times.  This is my third effort and so far, my most successful.  I have been able to keep this one alive for 4 years so far.  Gardenias need bright light, high humidity, and well drained soil with a pH between 5.0 and 6.5.  Normally, I would not bother with the pH, these can be really tough plants to keep going.  I water these sweethearts to keep them going and I am not fond of watering.  I believe in xeriscaping whenever possible.  This is also one of my plants I never forget to feed fertilizer every spring.  
Scraggly Gardenia - 2012
Gardenia in Bud 2012
I used to have 3 gardenia plants, then about 3 years ago I was down to one gardenia. Things are looking a bit iffy now.  My last gardenia plant is terribly, terribly sad.  I trimmed it way back hoping it will begin to fill in.  It does appear to be filling in.  Thank goodness. I have a few photos to show you today so you can see what's going on here.  Before we go any further.  We'll go over what's right and what's not right in the world of gardenia's on the sunny side of Susan.  I'm still researching the growth I see below and what I need to do to fix it.  I see good growth and I also saw no air plants or Spanish moss growing on the gardenia this year!  This was TERRIFIC to see.  Last year I spent many days picking air plants off and moss of the gardenia and checking it daily.  I learned from my tree guy that when pruning the gardenia that it is absolutely necessary to trim it flush with the joint.  If you trim it and leave any nubs at the joint, it gives the Spanish moss and air plants a little "seat" to rest on and take hold on your plant.  I am a much more careful pruner now.
Gardenia Filling In - 3/17/2012

Growth on the stems of Gardenia - 3/17/2012

Sunday, March 18, 2012

Walking Iris (Neomarica gracilis)
Walking Iris (zone 8a - 11) 
Those walking irises have walked back into my life. My mom gave me some walking irises a few years ago. I tried planting them in a container and they did nothing, not even flower. I immediately transplanted them into the ground with a northern exposure in zone 9B. That worked wonders. The following spring, we got blooms and every year since I am amazed at the beauty of these flowers. These springtime blossoms send out little shoots away from the main plant to expand and grow a new plant. Once it roots, it can safely be separately from the parent plant and shared with your friends so they can enjoy the beauty of this lovely plant in their yard since it multiplies so easily. I'm so glad to have this plant walk into my garden. This plant will take full sun to full shade and has average watering needs. For those in the climates cooler than zone 8a, this can be grown as a house plant and should flower in the spring, but keep in mind that it has a very short-lived blossom. With that and the special note below, I'm not certain keeping it as a houseplant would be worth it to me between grand kids and pets. *Special Note about this plant: ALL PARTS OF THIS PLANT ARE POISONOUS IF INGESTED


Ligustrum (Ligustrum japonicum)
Flowering Ligustrum
Ligustrum is one of most popular hedges seen in the southern states because it grows fast, it's easy to shape into a bush or a tree, it tolerates our crummy soil, and it's inexpensive.  During the spring it has a lovely, little white flower that attracts bees and butterflies and smell quite nice.  It is usually one of the signs that warmer weather is here to stay.  These come with a warning that they can be invasive.  I have these everywhere.  They grow so quickly they need to be trimmed every 3 to 6 months.  If you trim too much off, you risk having nothing but sticks behind since the insides of the shrubs are essentially bare sticks  as all the leaves are mostly on the outsides of the shrubs. 


Confederate Star Jasmine (Trachelospermum jasminoides)
Confederate Star Jasmine
Oh the sweet smell of jasmine is filling the air as you walk up to my front door from the driveway.  The jasmine has started to bloom....just barely, but it has started to bloom.  It's like being in heaven.  However, I won't lie about this little bugger.  Jasmine vines will choke the heck out of any plant near it if you don't watch it and keep it in check.  I need to keep an eye on it and trim it back every year.  This plant grows 8a - 11 again and guess what, yep, this one is poisonous too.  In fact, just touching this one can cause skin irritation for some people.  I have some in front and some in back.   I used to have in a container on the lanai, but to frank, the scent was a bit too strong.  It's a bit better to have it wafting in on the breeze.  Full sun to partial shade will work for this plant, but it needs some sun so don't put it in a corner of the yard where no sun will reach it.  It has average water needs but it is drought tolerant so it's a great plant for people who garden with plants that are native to their area or like plants native to their area.  The seeds can be successfully stored from this plant.  Allow the pod to mature on the plant and then collect the pod, split the pod and then save the cleaned seeds.

 *Special Note about this plant: ALL PARTS OF THIS PLANT ARE POISONOUS IF INGESTED

Saturday, March 17, 2012

Original pot of Bromeliads left behind
Criminal caught - released to the wild.
Caterpillars can do an immense amount of damage to your garden in a short amount of time with their voracious appetites.  In the years of having my container garden on my lanai, I've learned what can happen when a caterpillar gets loose on my lanai.  The cute, little ball of fuzz moves from one plant to the next chowing down on all the new, tender growth first.  I have this crazy solution for this problem when I find an infected plant.  I quickly pull it away from the rest of the plants and quarantine it.  Where exactly is quarantine?  Out of the lanai and to the back of the house.  The back of the house is nasty!  I hide all the plants that I am not ready to deal with in the back of the house.  This is because I live in a deed-restricted community that has a rule book that is so thick that it covers how many and what kind of pets you are permitted to have.  
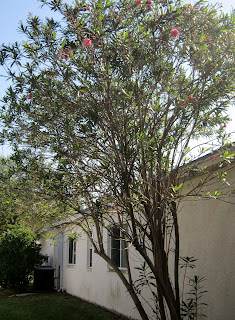
Oleander flowers
Oleander all grown up
 Soooo, the last time we had an infection, my oleander tree (also known as the Charlie Brown tree by my husband), was moved to the back of the house along with the white bird of paradise.   Both of the plants were kept in medium sized pots at the time.  I just planted them in the ground since the general rule I follow is once they are outside the cage they can never be returned.  They did ten thousand times better outside in the ground.    If I could only be sure the deer wouldn't eat the rest of my plants I'd be able to move them outside too and they'd also be able to grow much bigger and flourish.

Today, I spent a lot of time outside doing more spring cleaning.  I planted the last of the seedlings into permanent homes and resowed more chive seeds.  I staked the last of the bean plants to something or other.  It's quite funny to see them all because I went hunting in the garage for whatever I could find.   So there are metal pipes, dowel rods and even a  couple of curtain rods in my beans.  The beans aren't picky as long as it is sturdy enough and straight, they don't care.  When the bean plant bushes up a bit, it will hide the ugliness of whatever I used anyway.  I felt like I got a lot done because I felt all grimy and my body hurt all over.    
More than anything, it looked clean enough to sit down and have coffee out there in the morning.  What is clean enough?  Clean enough means that I will sit and drink my coffee without getting up every 2 seconds to clean something or fix something.  Clean enough means that I will sit and drink my coffee and actually enjoy the view.  What does the view look like?  I thought you'd never ask!