shelstring blog: Just Sittin'
I happened upon this post of your and I thought it was just the nicest part of my day. I think it was nice that your hubby helped you on your bench when ya needed it but left you to do it with your boy when ya didn't. I think it turned out beautiful. What a great project and great success you had. I hope you enjoy it for many years and the memories follow your son into the years with his own children.
Monday, November 26, 2012
Wednesday, May 23, 2012
Work has been a little crazy lately so apologies for being absent. My plants are missing me as well. Today, they screamed and cried for attention by sagging and laying down and threatening to die on me. After 3 days of nearly 90 degrees and no water, I sure hope they survive. It's been just terrible here and I've been so tied down at work. These are excuses. Lame excuses. Today, I made the time. I also made the time to repot 3 of my orchids that were literally climbing out of the pots and pulled one out of a pots that was super soaking wet because there was no drainage hole in it. That last one would have rotted and died in no time flat. I checked on the new baby I potted and so far it's still alive.
The plumeria plants are all doing well. Every slip now has leaves coming. One is doing better than all the rest, but every one of them has leaves coming. This is very good news. My husband calls them stick plants. He couldn't believe I would actually get plants from the slips. To be honest, I wasn't all that confident myself. I'm not super gardener. I'm an average person who likes to garden when I have time on the weekends or if I'm not too tired after work. I love flowers and plants and learned this love from my grampa and my mom. However, I am forgetful of my plants in the house and they often die from lack of water. This is why I can only have outside plants. :) If you recall, the plumeria slips came from Hawaii and I think if I protect them from frost, they'll be fine.
 The Curcuma Ginger graced us with its blossoms this week, while the Chinese Lily finished blooming. I forgot just how pretty these were. We talked a while back about these and how you can use these as house plants if you live in the colder zones. Just remember to take advantage of your warm outdoors in the summer months. I'm thinking about moving all the Chinese Lilies and the new lilies I got for Mother's Day in the yard so they can increase in number.
 Finally, I thought we'd look at the damage from the deer. We talked about trying to plant outside the screened patio or lanai despite all the deer. I planted some lavender, which are heavily scented and therefore deer-resistant. I also planted sunflower seeds. The poor little sunflower seedlings are trying to grow, but are having one heck of a time. The deer come by and continue to nibble on them. I thought you might like to have a gander at them and see what this damage looks like so you can recognize it in case it's not prevalent in your area. For me, it's a daily problem. They even ate my hanging baskets of petunias. I'm now a certified Bambi-hater. I have gotten a few more ideas to try to keep the deer away. A master gardener suggested I try garlic oil with dish soap and water and spray it on the plants. This is my next solution to try. If you decide to try it first, let me know how it works for you.
 |
| Plumeria 5/19/2012 |
The plumeria plants are all doing well. Every slip now has leaves coming. One is doing better than all the rest, but every one of them has leaves coming. This is very good news. My husband calls them stick plants. He couldn't believe I would actually get plants from the slips. To be honest, I wasn't all that confident myself. I'm not super gardener. I'm an average person who likes to garden when I have time on the weekends or if I'm not too tired after work. I love flowers and plants and learned this love from my grampa and my mom. However, I am forgetful of my plants in the house and they often die from lack of water. This is why I can only have outside plants. :) If you recall, the plumeria slips came from Hawaii and I think if I protect them from frost, they'll be fine.

 Finally, I thought we'd look at the damage from the deer. We talked about trying to plant outside the screened patio or lanai despite all the deer. I planted some lavender, which are heavily scented and therefore deer-resistant. I also planted sunflower seeds. The poor little sunflower seedlings are trying to grow, but are having one heck of a time. The deer come by and continue to nibble on them. I thought you might like to have a gander at them and see what this damage looks like so you can recognize it in case it's not prevalent in your area. For me, it's a daily problem. They even ate my hanging baskets of petunias. I'm now a certified Bambi-hater. I have gotten a few more ideas to try to keep the deer away. A master gardener suggested I try garlic oil with dish soap and water and spray it on the plants. This is my next solution to try. If you decide to try it first, let me know how it works for you.
Sunday, May 13, 2012
Happy Mother's Day! I've spent nearly all of my mother's days the same way with a few exceptions. I am willing to bet I am not alone. I spend them in the yard and garden. Mother's Day is the turning point in the year - the sign that it is safe to plant. Safe that frost won't sneak up on your tender seedlings and snatch them up in a brutal overnight gone bitter cold. There were more than a couple times that I forgot the golden rule of waiting until Mother's Day to plant and got impatient only to lose some of my early planted flowers to frost.
As I think back upon all of the years of Mother's Days that have passed, it is the earliest ones. The leanest ones. Those when we has the least. We didn't plant a lot of varieties of flowers, but I always planted marigolds. They were my grandpa's favorites. I guess it's my
tribute to him. He had a beautiful garden. When I was little girl and went to his house, I thought he had the biggest and most beautiful garden. The lesson for today is to really pay attention to these zone charts and freeze dates and don't let your impatience get the best of you.
Traditionally, I receive some plant each year from one of my daughters. Last year, I got my Lace-cap Hydrangea. This year, I got a really pretty day lily and a large purple Phalanopsis orchid from her. Day lilies are great plants. They put on a wonderful show for a flower and they are super fragrant. Each of them has a different zone range but they have a great zonal range. The lilies have average watering needs and need good drainage. They'll come back the following the year in greater abundance and continue to multiply. This is a great plant to share with your friends by just giving them some of the bulbs.
I admit that today I was a bit impatient myself and cut that little baby off my orchid and potted it. Now, we just wait and see if it will get some roots and live on its own. I also repotted it with some fresh potting media.
Monday, May 7, 2012
 |
| Plant Media |
 |
| Orchid Leaves |
Let's take a look at that phalanopsis orchid. We'll start at the bottom and look closely at all areas of the plant and by the time we're finished, you won't believe this little orchid had so much to tell us. This first photo looks at the plant media or the stuff that the orchid is planted in. It's mostly old moss and very little bark. Most of the bark has broken down and the moss is mostly ineffective in holding much moisture. We'll talk about how we know this in just a little bit. We can see it's inefficient planting matter because you can see all the little poke holes from my fingers sticking in it checking to see if it was wet or dry to determine whether or not it needed water. The second photo focuses on the leaves. This is our second giveaway that the the plant matter is not working well in the water retention area. We know this because our leaves are all wrinkled. If you look very, closely you can see the oldest leaves are the most wrinkled and the newest leaves are firm, strong and greener. What you cannot see are the older leaves feel softer and thinner and kind of saggy.

 Next, we see this little protuberance coming out of the base of the plant if you look real close. This is a new stem. Most of the time when you buy an orchid, you try to purchase the ones with more stems because the more stems you have, the more flowers you get blooming at the same time. This is, after all, why we buy orchids. Isn't it? We want the spectacular display of flowers. I was really happy to see a new stem coming. Normally, our orchids, flower. Then the flowers die and the stems, die off and we cut them back and new stems come. This plant has been really unusual in that the stems, never died off. So..... I never cut them back. This stem will make a third stem on this plant since the other two stems are currently flowering for the third or fourth time. I've lost count to be honest. The next photo shows the plant flowering with......a bud. Each stem has an additional bud. So this plant is by no means finished flowering. You can see it's a healthy blooming plant despite the desperate need to have the planting media replaced.
This plant has one final story to tell us. What you see is a new baby growing on the top of a stem. Two new leaves have formed at the top of the stem at a juncture below the flowers but substantially above the lower leaves. The next step for me is to cut this stem off and plant this set of leaves in some mossy bark media and let it root. It will shoot up a stem and flower when it's mature enough. What am I waiting for to but this baby off? The same thing to give it some fresh moss and bark. I'm waiting for it to stop flowering. :)
Sunday, May 6, 2012


Saturday, May 5, 2012

 The junior gardener was a no show today, so I had to harvest my own beans. They were huge!! They are perfect for making dilly beans. For those of you who are not from our neck of the woods, dilly beans are beans made like pickles and preserved in a brine bath with dill. Typically, they are very large beans all cut to the same size and tall enough to fill the jar from bottom to top. I still left plenty of beans on the plants for master Josh to have some to harvest when he comes to visit next week. What I think is the coolest part is that I have these dinky little plants in these dinky little containers producing monster beans week after week. So, this is an important lesson for everyone. You don't need to have a gigantic yard and work in your garden every day for it to produce great things for you and give you an enormous sense of pride and accomplishment. This reinforces my desire to make that little sign I've been wanting to make "What happens in the Garden comes to the Table." I saw one that said "What happens on the patio stays on the patio" and I thought it was dumb. I think that is one of the most over used and abused sayings there is and doesn't even make sense in most cases.
 I noticed just before I left for Charlotte that we have 2 more Bird of Paradise flowers. I'm trying to be patient and let the seed pods develop. We'll see if I can catch them after they turn brown but before they release the seeds. This is rather tricky business when you work a full time job and get wrapped in you work and forget about the gardening stuff from time to time. In other words, live a normal life. :) I try to visit my plants but I don't always see all of them and the Birds of Paradise are in the back of the house where I hate to visit. Usually I try to visit them only once or twice a week and sometimes even less than that. Why? Ants. I hate ants in Florida and I'm always afraid I'm going to find them during my walks back there. Just the same, we're keeping our eyes on them and trying to nab those seed pods and the precious seeds they hold.
Wednesday, May 2, 2012
 |
| Parsley seed progress 5/1/2012 |
 |
| Tam's year old Parsley 4/27/2012 |
 |
| Basil seedlings 5/1/2012 |
The last thing I wanted to talk about were the beans. Those beans, as you may recall, have been a real challenge this year. I lost a total of 4 bean plants and my avocado to whitefly. So, I thought you'd like to know that the remaining bean plants have already been harvested once and are again loaded with beans waiting for Saturday's visit of the little gardener to arrive and gather up the harvest in his basket. He was so excited about what we gathered that I just don't have the heart to harvest without him. These beans can wait until the weekend to be cut from the plant. Considering the rocky start we had, things are indeed looking rosy once again.
 |
| Bean harvest 4/22/2012 |
Tuesday, May 1, 2012
 |
| Queen's Tears |
 |
| Repotted Queen's Tears parent & pup |
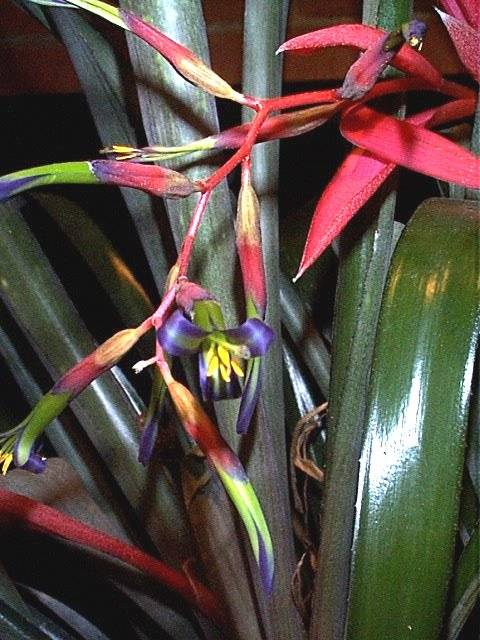 |
| Queen's Tears (billbergia)close up |
Monday, April 30, 2012
 |
| Chinese Lily 4/20/2012 |

 The Lemon Lime tree had a lot of trouble. I sprayed it several days with my homemade white oil using my new sprayer since the old sprayer crapped out finally. I ended up with more oil on me than on the tree. I sprayed both trees to be on the safe side. Today, I did a little inspection and while I saw a couple of ants on the tree, the ants were not moving. It was not the ant parade I saw a few weeks ago. I also had a nice surprise of a nice sized piece of fruit that did not fall off and two new flowers beginning.
 |
| Kalanchoe 4/30/2012 |
Wednesday, April 18, 2012
 |
| Petunias |
 |
| Hanging Terrarium |
Friday, April 13, 2012
 |
| Ant Feeding Frenzy Put to an End! |
 |
| Plumeria |
 |
| Parsley |
Tuesday, April 10, 2012
 |
| We have BEANS!! |
 |
| Drying Lavender |
I also harvested the lavender that had flowered for two reasons. I want the lavender to bush out a bit rather than being tall and spindly. I also thought it would be nice to take advantage of the blooms and allow new blossoms to take their place. I have pulled all the leaves off and tied them into 3 bunches and hung them upside down to dry out. They can be used in sachets, soap, candles or in a small vase. They will stay smelling sweetly for a long, long time. I wanted to try to do this today since I took yesterday, today and tomorrow off work.
Monday, April 9, 2012
 |
| Oleander 4/9/2012 |
Let's talk a little about what I learned about oleanders. These plants are extremely poisonous. I was not aware when I got this plant. In fact, I'm not sure if I bought it myself or my parents got it for me. I know we all thought it was a beautiful, flowering shrub. "Oleander poisoning occurs when someone sucks nectar from the flowers or chews leaves from the oleander or yellow oleander plant. Poisoning can also happen if you eat honey made by bees that used the oleander plant for nectar."1 The poisonous toxins made by this plant are contained in all parts of the plant:
 |
| Close up of Oleander 3/17/2012 |
- Flowers
- Leaves
- Stems
- Twigs
Saturday, April 7, 2012
 |
| Aloe Vera plant has baby! |
 |
| Twice transplanted aloe |
 |
| Cimbidium Orchid |
 |
| Shin Shiang Diamond 'Sun Cattleya |
Friday, April 6, 2012

 |
| Torenias 4/6/2012 |
Thursday, April 5, 2012

The pointsettias were beginning to rot in the house over the winter because the aluminum foil wrapper around the pot was holding all the water. They smelled to high heaven when I brought them outside, took off the wrappers and watched the stinky water pour out. I thought I would pass out from the smell. I was certain they were going to die since they were so soggy and stinky. I tossed all of the plants that looked like they had a remote chance of living (about 6 plants) into a single pot with some soil and said a few prayers over them. I deprived it of water for some time and then slowly started watering it on it's normal schedule again after it seemed to start to recover. When it seems like it's doing well enough I'll cut it back so it's not spindly and a bit more full. But, right now I would rather see it healthy more than anything. As you can see from the photo, it's still on the mend but not looking too bad. Pointsettia plants, native to Mexico, like it hot and good drainage. Drying out a little between waterings is what this plant likes. Too much water as we saw will kill it. This is a zone 10 and higher plant, but I've managed to keep mine alive without a problem in zone 9b and they grow quite large. Obviously, these plants cannot tolerate frost at all and must be brought inside at any threat of hard or soft frost threat. The nurseries get their colors for the Christmas holidays by depriving them of light for 14 hours at a time for a couple of months from the month of November onward. I found that I got the same color right around the holidays or just after by doing nothing at all. These are not the easiest plants and I see my neighbors throw them away year after year to my chagrin.
 The beans seem to be recovering from the whitefly incident well enough to be beginning to flower. This means I can look forward to seeing some beans soon! YAY! Take a look at what I saw today. You can see that some of the leaves still look a little goofy but the plant itself seems to be recovering nicely. Look at that gorgeous, little, white blossom. I am so happy I got those sticky, yellow cards and even more happy I have extras on hand in case those miserable little buggers come back.
Wednesday, April 4, 2012
 |
| Lavender planted on 4/4/2012 |
.JPG) |
| Florida Lavender |
.JPG) |
| French Provence Lavender |
Since I have no basement in here in Florida, I now hang in a back bedroom that is not used frequently. The idea is to put somewhere where it won't be disturbed much. Lavender likes full sun, good drainage and it seems to do pretty well. They have average watering needs and do not do well if you let them go too long without water. They prefer a sandy soil. If you have clay soil, add sand to give it the sandy texture it prefers. I water every other day when temperatures are in the 70s to mid 80s and every day when the temperatures are mids 80s and above. There are some varieties that do well in shade as well. There are 3 types of lavender: English (zones 5-8) Spanish (zones 7b-10b) and French (zones 8a-10b). The Provence lavender I chose is a special French lavender grown for making perfume. You can see the difference between the two different lavenders I'm growing in the photos above. Maybe we can try making some essential lavender oil from the French Provence lavender. If you are interested in this, I have a link for that. Everything lavender has everything you could possibly want to know about lavender. I was really captivated by their site. I admit that I'm enough of a lavender nut that when I went to the south of France I sought out the lavender fields. I searched and searched until I was able to find a supplier of the French Provence lavender for my home garden and I am happy to have 4 plants now planted in it.
So anyway, we have this little experiment going on now. Two of the French Provence lavender plants are inside the lanai and two are outside the lanai planted on an South- Southeastern exposure. We'll keep our eyes peeled on them and see what happens to the plants and take note of the differences.
I thought that my seeds were not doing anything at all and was ready to go buy plants. I noticed this week that I was wrong AGAIN.
 |
| Parsley plants 4/4/2012 |
Take a look at the photo and you'll see the parsley is actually starting to come in. It's just me being impatient. This is a problem I often face, not waiting long enough. I also found a little basil seed must have blown from my basil plants last year and taken hold this spring in the planter of dill or something strange that I cannot explain. I discovered a single basil plant growing. I picked it out and carefully moved it to a safe place where it has plenty of room to grow. This is where it comes in really handy to know what your plants look like as opposed to weeds. This way you don't accidentally pull a viable plant versus a weed. I also got the plumeria
 |
| Basil 4/4/2012 |
slips planted. I received instructions with the slips but I am never comfortable with just instructions like that. I always search the internet too. I found a wonderful website with a tremendous amount of good info on plumeria plants and used the instructions they had for planting mine. The one thing I did differently was that I did not use rooting hormone. I didn't have any on hand and so I had to do without. I have some on order so I'll have it on hand next time I really need it. However, I did follow all the other instructions they had posted. I also cut out the photo of each type of plumeria and put it in plastic and put it with the matching slip. They said it will take 90 days for the plumeria to take root. I'm wondering how impatient me is going to deal with this. I check my budding orchid several times a day just to see if there's any change. :) I have a feeling it's going to be a very long 90 days. Wish me luck.
 |
| Newly planted plumeria slips 4/4/2012 |
Monday, April 2, 2012
 |
| Plumeria slips |
Perlite is volcanic glass without shape that is from snowy white to grayish white in color with a high water content and the unusual characteristic of having the ability of increasing its volume from 4 to 20 times when heated to just the right temperature. Typically this is above 1600 F. Chemically, it's inert and has a pH of around 7. The US is both the largest consumer and producer of this non-renewable resource that is mined.
In 2010, estimated perlite consumption in the US was as shown in the table:[1]
| Fraction | use[1] |
|---|---|
| 53% | building construction products |
| 14% | horticultural aggregate |
| 14% | fillers |
| 8% | filter aid |
| 11% | other |
- Aeration and drainage
- Sterile Rooting Medium - stimulates root initiation
- Hydroponics - Excellent media with superb results
- Neutral pH & Sterile
- Weed-free & Disease-free - good for seedlings
- Carrier for fertilizer, herbicides, & pesticides
- Clean, odorless, lightweight & safe to handle
- Serves as insulator to reduce extreme soil temperature fluctuations
- Does not deteriorate
- Holds moisture without getting soggy
Good Perlite Links:
 http://www.schundler.com/outdoor.htm
http://www.thegardensuperstore.co.uk/Perlite__uses_in_the_garden.htm
http://www.simplyhydro.com/growing1.htm
http://www.perlite.net/
I also planted a little basket of lavender, parsley seeds and chive seeds after work today. It made me happy. Let's watch and see how it does.
Sunday, April 1, 2012
 |
| Curcuma Ginger Returns 4/1/2012 |
 |
| Curcuma Ginger in Flower 2011 |
 |
| kalanchoe blossfeldiana |
My Kalanchoes are in their second flowers for the year. It has been a strange year. They flowered through the entire winter because it was so mild. About a month or so ago, I cut them way back because they looked so straggly and added a bunch of fresh soil and some all purpose time-released fertilizer. As you can see above, we have some new blossoms coming. Kalanchoes have never really been on my list of favorite flowers for a weird reason from my childhood. My mom had them lining the front walk to the front door. The bees love these flowers. I had gotten a really bad sunburn and had open blisters all over my arms. I have a memory of the bees and the open blisters and these flowers. So, until last year, I refused to have these plants. You'll never guess where I put them. lol I moved them to the lanai after I realized my error. They got a bit neglected until I moved them to the lanai. The patio or lanai is where I spend the bulk of my time.
So let's talk a bit about kalanchoes and what they need. Kalanchoes originated in Madagascar and need temperatures between 60 F and 85 F. Since they are succulents, they are drought tolerant but if you let it dry out completely, it will wither and it will take a while for it to come back. They need bright light, so a shady location is not the best place for it. Too much sunlight and it will grow a lot but reduce its blossoms. This is probably why it's doing so well on my lanai. The insects it is prone to are aphids, scale, spider mites and nematodes. These are simple to propagate. Just cut a stem that's 4 - 6 inches and remove the lower leaves and stick it about 1/2 way into the soil and water like it already has roots and is a plant every 2 -3 days. It should take root and start a new plant that you can share with a friend. Probably the most important thing to remember with your kalanchoe is to never let the temperature fall below 40 F. Bring it inside if it's going to get that cold to protect the plant. Otherwise, it's a stalwart little soldier of a flower.
Today's Links:
Curcuma Ginger Sites:
Kalanchoe sites:
Subscribe to:
Posts (Atom)